Hi,
In this post, I’ll show you how to consume a SOAP web service (asmx web service) from iOS. It’s pretty easy to start off with.
There are many links that talk about the use of many frameworks like ASIHttp framework, JSON Framework, wsdl2objc tool, etc. But for the purpose of this post, I would like to keep it simple (KISS! ;-)) Those frameworks are basically used for consuming web service methods that are more complex and those that return JSON response or things like that.
More on those later. For now, let’s concentrate on consuming a very basic ASMX web service hosted by w3schools.org, Temperature conversion web service.
As you can see, this web service exposes two methods: Convert a given temperature from Celsius to Fahrenheit and vice versa. In this post, let’s consume the first one (Celsius to Fahrenheit method).
The steps to follow for consuming the service from XCODE are given below:
- Create the request SOAP Envelope message as string
- Create a request to the URL
- Add required request header elements
- Initiate the request
- Implement connection delegate methods
- Parse the response.
For creating the soap request envelope message, open the method definition in the browser and copy-paste the request string as shown in the page. A sample is shown below:
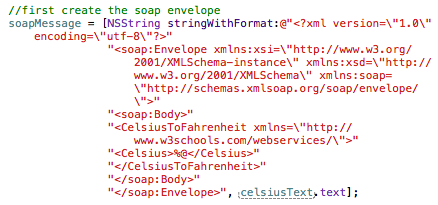
Note the format specifier in the middle of the soap message. That is to take the value entered by the user from the text field.

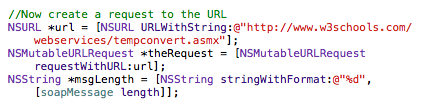
Next step is to create a request to the URL of the web service. Sample code is shown below:
Next, add the required header elements to the request object. You can find out what header elements are required in the message by looking at the sample request objects shown in the webpage of the service’s method. Sample code shown below:
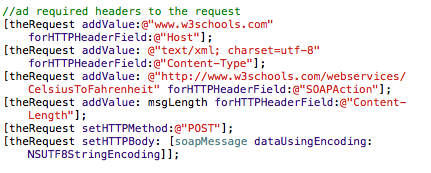
Finally, set the body of the request by converting the soapMessage to bytes (shown in the last step above).
Next step is to implement the NSURLConnection delegate methods in the application. These methods are used to implement functionality at different stages of the request. A sample of the methods is shown below:
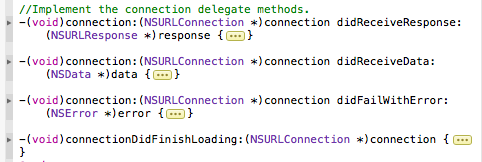
The code of the connection methods is given below:
-(void)connection:(NSURLConnection *)connection didReceiveResponse:(NSURLResponse *)response {
    [self.webResponseData  setLength:0];
}

-(void)connection:(NSURLConnection *)connection didReceiveData:(NSData *)data {
    [self.webResponseData  appendData:data];
}

-(void)connection:(NSURLConnection *)connection didFailWithError:(NSError *)error {
    NSLog(@"Some error in your Connection. Please try again.");
}

-(void)connectionDidFinishLoading:(NSURLConnection *)connection {
    NSLog(@"Received %d Bytes", [webResponseData length]);
    NSString *theXML = [[NSString alloc] initWithBytes:
                        [webResponseData mutableBytes] length:[webResponseData length] encoding:NSUTF8StringEncoding];

    NSLog(@"%@",theXML);

    //now parsing the xml

    NSData *myData = [theXML dataUsingEncoding:NSUTF8StringEncoding];

    NSXMLParser *xmlParser = [[NSXMLParser alloc] initWithData:myData];

    //setting delegate of XML parser to self
    xmlParser.delegate = self;

    // Run the parser
    @try{
        BOOL parsingResult = [xmlParser parse];
        NSLog(@"parsing result = %hhd",parsingResult);
    }
    @catch (NSException* exception)
    {
        UIAlertView* alert = [[UIAlertView alloc]initWithTitle:@"Server Error" message:[exception reason] delegate:self cancelButtonTitle:@"OK" otherButtonTitles: nil];
        [alert show];
        return;
    }
}
In the last method, you can see that we have written some code to parse the response received from the web service.
Now, to enable our application to parse the response XML, we need to indicate that our app implements the NSXmlParserDelegate interface.
For this purpose, specify the same in the interface file as shown below:

Now, the next step is to implement the NSXmlParserDelegate methods. It has 3 methods:
- didStartElement
- foundCharacters
- didEndElement
The code of the above methods is given below:
//Implement the NSXmlParserDelegate methods
-(void) parser:(NSXMLParser *)parser didStartElement:(NSString *)elementName
  namespaceURI:(NSString *)namespaceURI qualifiedName:
(NSString *)qName attributes:(NSDictionary *)attributeDict
{
    currentElement = elementName;
}
- (void)parser:(NSXMLParser *)parser foundCharacters:(NSString *)string
{
    if ([currentElement isEqualToString:@"CelsiusToFahrenheitResult"]) {
        self.resultLabel.text = string;
    }
}

- (void)parser:(NSXMLParser *)parser didEndElement:(NSString *)elementName
  namespaceURI:(NSString *)namespaceURI qualifiedName:(NSString *)qName
{
    NSLog(@"Parsed Element : %@", currentElement);
}
The foundCharacters method is called when an XML tag is encountered that has some characters between the start and end tag. In our case, the response is wrapped between the CelsiusToFahrenheitResult tag. The characters that are found between the start and end tag are stored in the NSString variable string. Hence the code. The result string found is assigned to the result label on the screen.
When you put all the required pieces of the code together and run the app, you get this result.
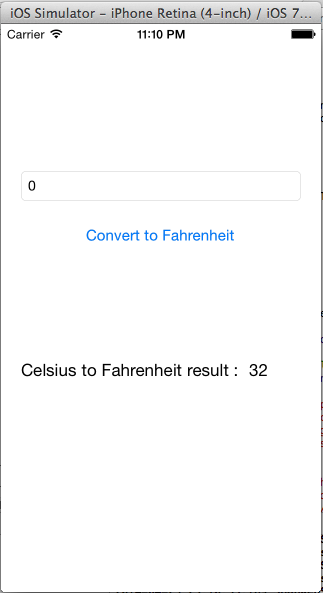
When the user enters the celsius value in the text box and presses the button, the web service is called and the resultant xml response is parsed and the resulting value is displayed on to the screen.
I have attached the complete sample application source code here. Do have a look. You can download a zip copy of the same there from the bottom right of the page.
Hope this helps!
 Press enter and the result will be as shown below. Due to security reasons, I have removed the username and password from the image but trust me, it shows the username and password there.
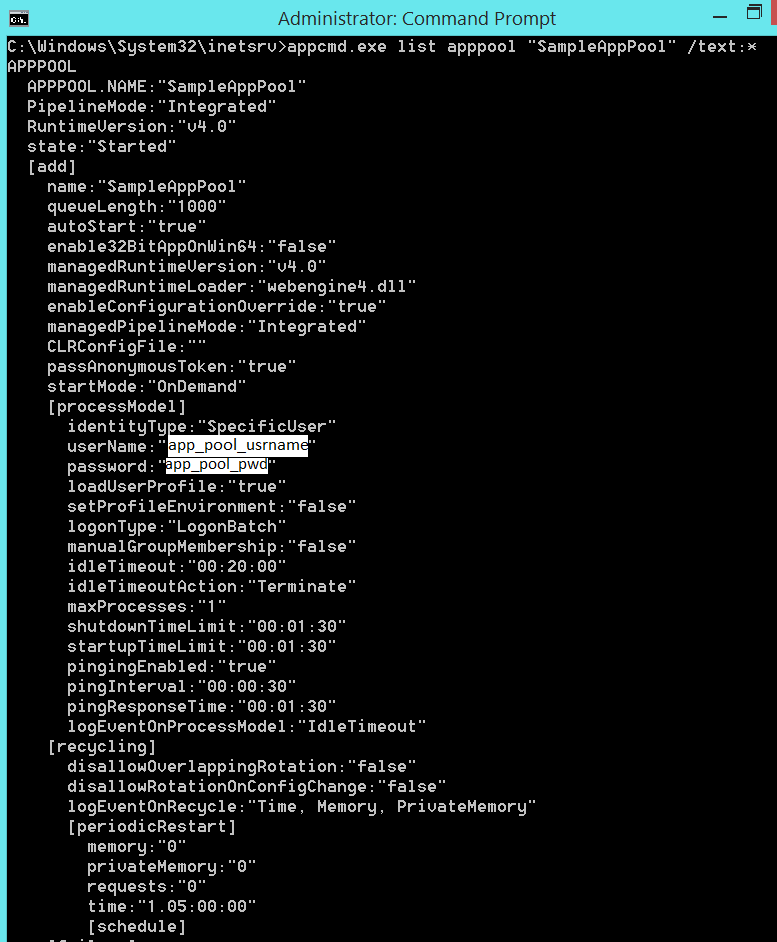 Hope this helps!


