Finding the Longest substring in a string that is a palindrome

Hi,

Recently my friend asked me this question so gave it a try and got it. So this is how the code goes:

using System;
using System.Collections.Generic;
using System.Linq;

namespace SubStringPalindrome
{
class Program
{
static int maxLength;

static void Main(string[] args)
{
string inputString = “ootntannanitindennedadinidadeleveledaibohphobiatattarrattat”;
string currentStr = string.Empty;
List<string> listOfPalindromes = new List<string>();

char[] inputStrArr = inputString.ToCharArray();

for (int i = 0; i < inputStrArr.Length; i++)
{
for (int j = i+1; j < inputStrArr.Length; j++)
{
currentStr = inputString.Substring(i, j – i + 1);

if (IsPalindrome(currentStr))
{
listOfPalindromes.Add(currentStr);
if (currentStr.Length > maxLength)
{
maxLength = currentStr.Length;
}
}
}
}

var longest =   from str in listOfPalindromes
where str.Length == maxLength
select str;

foreach (var item in longest)
{
Console.WriteLine(“Longest Palindrome : ” + item.ToString());
}
}

private static bool IsPalindrome(String str)
{
bool IsPalindrome = true;
if (str.Length > 0)
{
for (int i = 0; i < str.Length / 2; i++)
{
if (str.Substring(i, 1) != str.Substring(str.Length – (i + 1), 1))
{
IsPalindrome = false;
}
}
}
else
{
IsPalindrome = false;
}
return IsPalindrome;
}
}
}

Hope this helps!! 🙂

CodeProject

‘yield’ Keyword in C#

Hi,

This post is mainly about the ‘yield’ keyword provided in C#. I never really got a chance to use this keyword until now. So thought I would just blog about it. This blog is not of my own writing; I would say it is rather a re-blogging of a discussion about the keyword in this link.

yield‘ keyword is used in an Iterator block to provide a value to the enumerator object or to signal the end of an iteration. The syntax of yield statement is as follows:

yield return <expression>;
yield break;

The following example clearly illustrates the proper usage of the keyword. The example shows two ways of returning an IEnumerable of “Product” entities.

Version-1: Using yield return

public static IEnumerable<Product> GetAllProducts()
{
    using (AdventureWorksEntities db = new AdventureWorksEntities())
    {
        var products = from product in db.Product
                       select product;

        foreach (Product product in products)
        {
            yield return product;
        }
    }
}

Version-2: returning the list

public static IEnumerable<Product> GetAllProducts()
{
    using (AdventureWorksEntities db = new AdventureWorksEntities())
    {
        var products = from product in db.Product
                       select product;

        return products.ToList<Product>();
    }
}

The main usage of the yield keyword can be realized when we have to calculate the next value in the list or the next item in the list. In the second version above, when the return keyword is reached, the entire list is ready whereas in version-1, the entire list is not ready when the yield return statement is reached. Instead, for each occurrence of the yield return statement, the next item in the to-be-returned list is calculated.

One really good use of this type of functionality is that this helps spread the computational cost over a larger time frame. For example, if the list is hooked up to a GUI and the user never goes to the last page, you never calculate the final items in the list.

Another case where yield-return is preferable is if the IEnumerable represents an infinite set. Consider the list of Prime Numbers, or an infinite list of random numbers. You can never return the full IEnumerable at once, so you use yield-return to return the list incrementally.

In the above two versions, the one that is preferable is the version-2 as the product list is finite. So we can just calculate the complete list before itself.

And above all, thanks to the author of that post that  helped me clearly understand the usage of the keyword.

Hope this helps!! 🙂

Converting a string to stream and a stream to string in C#

Hi,

Today I’ll just put a small post about converting a string to stream and a stream to string in C#. These conversions are pretty much simple but they did cause some trouble to me. So thought I would just put it in my blog for easy reference later on.


Converting a string to stream in C#:

There are two steps in this process.

  1. Convert your string to byte array
  2. Read that byte array into a stream


Both the steps can be showing with the following code snippet:


string myString = “Amogh Natu”;

byte[] arrayOfMyString = Encoding.UTF8.GetBytes(myString”);

MemoryStream stream = new MemoryStream(arrayOfMyString);


The above variable named “stream” would have the stream notation of the string.


Converting a stream to string in C#:


This conversion is pretty much straight forward. The “ReadToEnd()” method does all the work for us by converting the stream into a string.


//Stream inputStream

string myString = stream.ReadToEnd();


Now “myString” would hold the string representation of the stream.


Hope this helps.! 🙂


Accessing impersonated user’s details from code behind in C#

Hi all,

Many of us might know that in web development, config files play a very important role. Reading config file entries in a code-behind file is a very common thing in web development.

Config entries are stored in web.config file in the <appSettings> tag and can be accessed using System.Configuration.ConfigurationManager.AppSettings[“keyName”];

But there might be a case when we may have to access the impersonated user’s details in our code. These details cannot be accessed using ConfigurationManager.AppSettings[].


To access the Impersonated user’s details, we use the classes in the namespaces

System.Web.Configuration and System.Configuration.

First, we open the configuration file as a “Configuration” object using the WebConfigurationManager.OpenWebConfiguration(“pathToConfigFile”) method. The WebConfigurationManager class is defined in the System.Web.Configuration namespace.


Then we get the identity section from the config file to retrieve the user details. This is achieved using the IdentitySection class defined in System.Web.Configuration namespace and “GetSection()” method of “Configuration” class.

The “GetSection()” method returns the ConfigurationSection object specified in the parameter to the method. The return object is to be type cast into the required object type, in this case, “IdentitySection”.


Then, IdentitySectionObject.propertyName gives the value of the corresponding property.


The complete sample code is as shown. I have written the code in the Page_Load method for the time being.


using System.Web.Configuration;

using System.Configuration;


protected void Page_Load(object sender, EventArgs e)

{

        Configuration objConfigFile;

        objConfigFile = WebConfigurationManager.OpenWebConfiguration(HttpContext.Current.Request.ApplicationPath);


        IdentitySection objIdentitySection = (IdentitySection)objConfigFile.GetSection(“system.web/identity”);


        if (objIdentitySection != null)

        {

            string username = objIdentitySection.UserName;

            string password = objIdentitySection.Password;

            bool impersonate = objIdentitySection.Impersonate;

            Configuration currentCOnfiguration = objIdentitySection.CurrentConfiguration;

         }

    }


The entry in the web.config file is as given below.


<system.web>

        <identity impersonate=”true” username=”domain\username” password=”pwdrandom” />

</system.web>


Make sure you specify the domain of the computer in the username part because if you specify only the username, there is a chance that you might get a runtime exception saying

Could not create Windows user token from the credentials specified in the
config file. Error from the operating system ‘Logon failure: unknown user
name or bad password.”


Hope this helps!! 🙂

Moving items between ListBoxes using JavaScript

Hi Everyone,

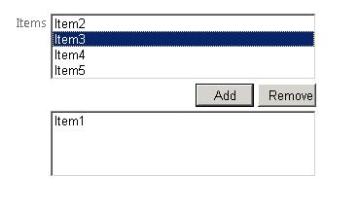
We all would have encountered the situation below where we are asked to select few items from a list of items. The selected items are transfered to another listbox by clicking a simple button. I have put a sample screen shot of that below.

Image

Now lets see how this can be achieved using JavaScript in ASP.NET.

Create a new ASP.NET website in VS2010. Visual Studio will automatically add a default.aspx page which has a master page to it. Lets add the Listbox controls to the page. I’ll put the Listboxes and buttons in a table tag so that the output is better..

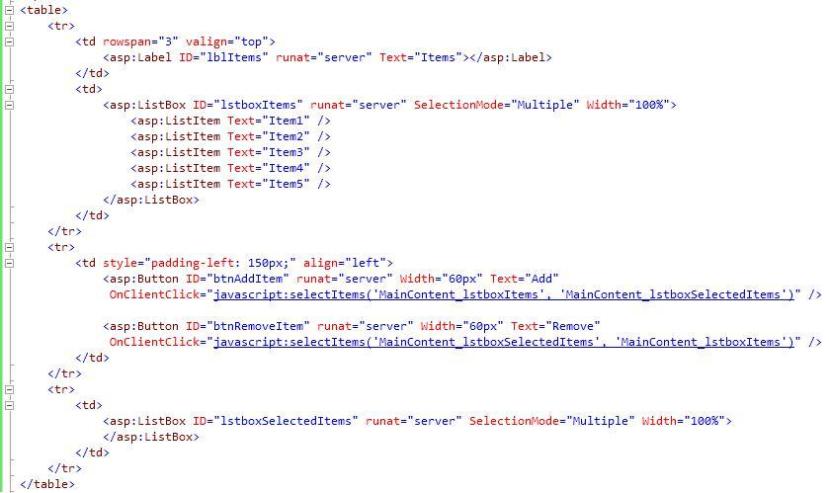
The code is as shown:

Image

Coming to the code,

You can see that I have added a label, two ListBoxes and two buttons, one to add items, other to remove the items. The first listbox is populated with static data (You can also load data into it dynamically from Database). The second ListBox is initially empty.

Before I explain the attributes of the “Button” control, I would like to explain the JavaScript function that I have written in order to perform the transfer of items. Again a screen shot of the JavaScript function.

Image

The function takes two parameters:

  1. the source listbox ID
  2. the target listbox ID

I have put comments in the code so that it is understood easily. Basically what is happening in the function is the selected items in the source listbox are taken. New “Option” is created for the target listbox and the items are added into the target listbox. Also, the selected items are removed from the source listbox.

Now coming back to the ASP.NET code, you can see that I have added an “OnClientClick” attribute to the button controls. This is because I have to call a javascript function on the Click event of the button. So for the “OnClientClick” attribute, we specify what type of script we are calling and also the name of the function along with parameters.

You can observe the following line in the OnClientClick attribute for the Add button:

OnClientClick=”javascript:selectItems(‘MainContent_lstboxItems’, ‘MainContent_lstboxSelectedItems’)”

If you get a doubt as to why I have put “MainContent_” before the IDs of the source listbox and the Target listbox, the reason is, our Default.aspx is placed inside a content place holder. Remember I mentioned that default.aspx has a master page to it earlier in this post?

So when a page placed in a content place holder is rendered, the IDs of all the controls in the page are Prefixed with the ID of the ContentPlaceHolder in which the page is placed. (“MainContent” in this example).

You are not done with this. You also have to add the HTML “onclick” attribute to the buttons in order to make it work. Add the below lines in the Page_Load function of Default.aspx.

btnAddItem.Attributes.Add(“onclick”, “return selectItems(‘” + lstboxItems.ClientID + “‘, ‘” + lstboxSelectedItems.ClientID + “‘);”);

btnRemoveItem.Attributes.Add(“onclick”, “return selectItems(‘” + lstboxSelectedItems.ClientID + “‘, ‘” + lstboxItems.ClientID + “‘);”);

Now save, build and run the application. You can move the items among the list boxes.

Hope this helps! 🙂

Retrieving column values as a comma separated string in SQLServer

Hi,

This post is quite the opposite of the previous post. That is, in the previous post, We inserted a comma separated string into separate rows. Here we will return a single comma separated string by concatenating values from separate rows.


The query for this is very simple. Say, our table has two columns, UserId and UserName. And we want a list of usernames as comma-separated string, then the query would be

SELECT UserName + ‘,’

FROM TableName

FOR XML PATH(‘ ‘)

The “FOR XML PATH(‘some path’)” returns the result in the form of xml with each select result surrounded by xml tags named “some path”.

For example, if the parameter in “for xml path” is “response”,

the query would be

“SELECT UserName FROM TableName FOR XML PATH(‘response’).

The result of the query would be

<response>UserName1</response>

<response>UserName2</response>

<response>UserName3</response>

<response>UserName4</response>

<response>UserName5</response>

and so on,…………

So, in our case, because nothing is mentioned as parameter to the FOR XML PATH(‘ ‘) function (not even space), the result of the query would be

UserName1, UserName2, UserName3, UserName4, ……….. and so on…

You have your comma-separated result. 🙂


Hope this helps!! 🙂

Adding items in comma-separated string into separate rows in SQLServer

Hi,

In this post, I’ll show how to insert a items in a comma-separated string into separate rows in a table. Consider for example we have a comma-separated string such as “amogh, anish, anvesh, uday”. after inserting into the table, the output should be like:


Expected Result


I have written a stored procedure which will take the comma-separated string as input and insert  a new row into the table for each item in the string.


The Stored procedure is as follows:


CREATE PROCEDURE AddCommaSeparatedUsersToTable

(

      @UserNames NVARCHAR(MAX)

)

AS

BEGIN

DECLARE @DELIMITER NCHAR(1)   –delimiter used to separate the usernames

DECLARE @tmpUserNames NVARCHAR(MAX)

SET @tmpUserNames = @UserNames

SET @DELIMITER = ‘,’                    –Delimiter is a comma

DECLARE @commaIndex INT    

DECLARE @singleUserName NVARCHAR(MAX)               —singleUserName is the variable which holds each item in the comma-separated string

SELECT @commaIndex = 1    

      IF LEN(@tmpUserNames)<1 OR @tmpUserNames IS NULL  RETURN    

WHILE @commaIndex!= 0    

BEGIN    

      SET @commaIndex= CHARINDEX(@DELIMITER,@tmpUserNames)    

      IF @commaIndex!=0    

            SET @singleUserName= LEFT(@tmpUserNames,@commaIndex– 1)    

      ELSE    

            SET @singleUserName = @tmpUserNames    

      IF(LEN(@singleUserName)>0)

      BEGIN                        

            INSERT INTO SampleUserTable

            (

                  UserName

            )

            VALUES

            (

                  @singleUserName

            )

      END

      SET @tmpUserNames = RIGHT(@tmpUserNames,LEN(@tmpUserNames) – @commaIndex)    

      IF LEN(@tmpUserNames) = 0 BREAK    

END

END


This procedure will insert each item in the comma-separated string (UserNames, given as input parameter to the procedure) into the table “SampleUserTable” in separate rows.


Hope this helps!! 🙂

Uploading large files using asp.net and IIS6.0

Hi,

We all must have obviously uploaded files somewhere or the other. Even in the websites that we create using ASP.NET, we might have to put the asp:fileupload control to facilitate file upload feature.

While developing websites or web applications, we might come across requirements that specify: Allow users to upload large files (file size typically greater than 10MB)

In such a case, only putting a file upload control in our website isn’t sufficient. The reason for this is, the upload filesize limit is set to 4MB by default in ASP.NET.

To allow large files to be uploaded in our website, we need to make a few configuration changes. The “httpRuntime” tag in the web.config file is where we need to change the file size limit.

The <httpRuntime> tag has an attribute “maxRequestLength” whose value is specified in “KiloBytes“. Also, increase the value of the “executionTimeout” attribute of the same tag so that the uploading doesn’t time out before the entire file has been uploaded.

The tag would look something like this:

<httpRuntime maxRequestLength=”2097152″ executionTimeout=”9999999″ />

This would allow for files upto 2GB to be uploaded. I have discussed this scenario more clearly in this post

But in some cases, we might also need to make changes at IIS side. We need to increase the values of some attributes in the Metabase file of IIS.

The Metabase.xml file is the one we need to modify to allow large files to be uploaded. This file is located at

C:\Windows\System32\inetsrv\

location.

But this file is by default in Read-Only mode and this cannot be changed by right-clicking the file and changing the mode. It has to be made editable in another way.

Procedure to make Metabse.xml editable: (FOR IIS 6.0 only)

  1. Open IIS manager (open Run -> type ‘inetmgr’ -> press enter)
  2. Right-click on the local computer name. Click on Properties.
  3. Enable the Checkbox that reads “Enable Direct Metabase Edit”.
  4. Click on Apply. Then OK.

The above procedure is only for IIS 6.0 as in IIS 7.0 and above, microsoft has removed the Enable Direct Metabase Edit option. I’ll come back to that later.

So, after the Metabase.xml file has been made editable, navigate to the file location. Its better to take a back up of the file before modifying it (just to be on the safe side :-)). The attributes to be modified are:

  1. AspBufferingLimit
  2. AspMaxRequestEntityAllowed

The values of both the attributes are specified in “BYTES“. Be careful about the units in which the values of these attributes are specified. The ones in IIS take values in BYTES. The one in the web.config file takes values in KILOBYTES.

Modify the values in the above attributes and save the file. Now your website should allow files upto 49MB to be uploaded. It is said that files upto even 100MB can be uploaded but I could never accomplish that! 😦 The maximum filesize my website accepted was 49MB. If anyone can come up with a solution to this, please make sure you share it 🙂

Another thing I would like to add to this is that if you are using web service to upload the file to an external content database like SharePoint, then you will have to change the binding configuration of the services as well.

When we add a service reference to our website, the corresponding service inding information is added to the web.config file in the website. To allow large files to be uploaded, the attributes in the binding information to be modified are:

  1. maxBufferSize
  2. maxReceiveMessageSize
  3. maxBufferPoolSize
  4. maxDepth
  5. maxStringContentLength
  6. maxArrayLength

Also, make sure you increase the timeout values here as well.

Please feel free to comment or make any corrections if required anywhere 🙂

Hope this helps 🙂

Error Condition: HttpException: maxRequestLength exceeded. ASP.NET

Hi,

While building ASP.NET web applications, we all would have almost certainly used the file upload control. But sometimes, we might encounter an exception message which reads, “System.Web.HttpException: maxRequestLength exceeded”.

The cause of this exception is simple. “maxRequestLength” attribute of the “httpRuntime” tag specifies the maximum size of input files that can be uploaded. By default, the value of this attribute in ASP.NET 4.0 is 4096KB (4 MB).

This value is set in the “machine.config” file which sets the maximum allowable file size for the entire machine as 4MB. This can be easily changed by modifying the “machine.config”. The configuration entry is as follows:

<httpRuntime maxRequestLength=”4096″ />

The size is always mentioned in “Kilo Bytes”. If we want the maximum allowable size of files to be say 25MB, then all we need to do is change the value of “maxRequestLength” attribute to 25600.

<httpRuntime maxRequestLength=”25600″ />

The above line would allow files up to 25MB to be uploaded. If this entry is added in the machine.config file, then all websites in that machine would allow files up to 25MB to be uploaded. If that entry is added in a particular website’s “web.config” file, then only that website would allow files up to 25MB to be uploaded. Other websites would allow only up to 4MB (Default size) files to be uploaded.

Just as an addition, the “machine.config” file is located at “%SystemRoot%\Microsoft.NET\Framework\Version\Config\machine.config”.

“SystemRoot” is the location where Windows is installed. Generally it is “C:\Windows”.

Hope this helps … 🙂