Invoke a POST method with XML Request message in C#

Hi,

To invoke a POST method located at a particular URL with an XML request message, we need to follow the below steps:

  1. Create a request to the url
  2. Put required request headers
  3. Convert the request XML message to a stream (or bytes)
  4. Write the stream of bytes (our request xml) to the request stream
  5. Get the response and read the response as a string

This looks much easier when seen in code. 🙂 Keep reading…..

So, the code for the above steps looks something like this:

namespace HttpPostRequestDemo
{
    class Program
    {
        static void Main(string[] args)
        {
            string xmlMessage = "<?xml version=\"1.0\" encoding=\"utf-8\" ?>\r\n" +
            "construct your xml request message as required by that method along with parameters";
            string url = "http://XXXX.YYYY/ZZZZ/ABCD.aspx";
            HttpWebRequest request = (HttpWebRequest)WebRequest.Create(url);


            byte[] requestInFormOfBytes = System.Text.Encoding.ASCII.GetBytes(xmlMessage);
            request.Method = "POST";
            request.ContentType = "text/xml;charset=utf-8";
            request.ContentLength = requestInFormOfBytes.Length;
            Stream requestStream = request.GetRequestStream();
            requestStream.Write(requestBytes, 0, requestInFormOfBytes.Length);
            requestStream.Close();


            HttpWebResponse response = (HttpWebResponse)request.GetResponse();
            StreamReader respStream = new StreamReader(response.GetResponseStream(), System.Text.Encoding.Default);
            string receivedResponse = respStream.ReadToEnd();

            Console.WriteLine(receivedResponse);
            respStream.Close();
            response.Close();
        }
    }
}

If the xmlMessage is formed correctly, then you should be getting the expected response from the web method located at the URL.

Hope this helps!

State Management using Cookies.

What are Cookies?

Cookies are nothing but a small piece of information that are stored at the client’s browser by the server. This small piece of information about the user is then sent by the browser in all subsequent requests to the same URL in the request. We can store anything in a cookie; General example of cookie usages are to store the user preferences, password remembering, storing user options, etc.

Generally cookies are stored a plain text files in the local disk of the user. Cookies can be accessed from anywhere in the application. Generally Cookies are lost after the user closes the browser but we can also have cookies that will persist even after browser is closed.

Cookies are mainly classified into two types:

  1. persistant
  2. non-persistant.

Persistant cookies:

As the name itself suggests, these cookies remain persistant in the client’s memory even after the browser is closed. They remain permanently in memory till they are explicitly removed or their expiration is reached.

Non-persistant cookies: These cookies do not remain in the client’s memory and are lost after browser is closed.

How to create cookies from code:

Generally we use the HttpCookie class to create an instance of a cookie for that session, then add the values that we want to be included in the cookie as key-value pairs. The below code explains this more clearly.

HttpCookie userCookie = new HttpCookie("infoCookie");
userCookie["username"] = "Amogh";
userCookie["City"] = "Hyderabad";
userCookie["Country"] = "India";

//adding the cookie to the Response object. This will be sent to the client on first request from the client.
Response.Cookies.Add(userCookie);

The example shown above is that of a NONpersistent cookie as it doesn’t specify any expiration time for the cookie. If we add an expiration to the cookie object, the cookie will become a persistent cookie. Example code is shown below.

HttpCookie userCookie = new HttpCookie("infoCookie"); 
userCookie["username"] = "Amogh";
userCookie["City"] = "Hyderabad";
userCookie["Country"] = "India";

//adding an expiration to the cookie
userCookie.Expires = DateTime.Now.AddDays(1);

//adding the cookie to the Response object. This will be sent to  the client on first request from the client.

Response.Cookies.Add(userCookie);

The “Expires” property of the HttpCookie object specifies that the cookie will expire after 1 day of its creation.

Reading values from cookie: Values from cookie can be read directly by using the Request object of the current HttpContext.

HttpCookie infoCookie = Request.Cookies["infoCookie"];
string city = infoCookie["City"];

Advantages of Cookies :

  1. Very easy to use.
  2. Browser takes care of sending and maintaining cookies from multiple sites

Disadvantages of cookies:

  1. Not secure as data is stored as plain text
  2. cookie size is limited to 4KB
  3. Some browsers may not support cookies. So care needs to be taken while using cookies in code.

Hope this helps!!

[Solution]configuration system failed to initialize – C# Exception

Hi,

Today I encountered an exception while working on an application. The exception was “configuration system failed to initialize”. The problem that I was having in my application configuration file was that I declared the <appSettings> tag immediately after the root tag <configuration>.

The schema of a configuration file mandates the “<configSections>” tag to be the first child of the root tag. Thus, if you put any other tag as the first child of root <configuration> tag, the application would throw an exception. So, ALWAYS, the <configSections> tag should immediately follow root <configuration> tag.

Correct Format:

<?xml version="1.0"?>
<configuration>
   <configSections>
      <sectionGroup name="applicationSettings" type="System.Configuration.ApplicationSettingsGroup, System, Version=4.0.0.0, Culture=neutral, PublicKeyToken=b77a5c561934e089" >
          <section name="your_project_name.Properties.Settings" type="System.Configuration.ClientSettingsSection, System, Version=4.0.0.0, Culture=neutral, PublicKeyToken=b77a5c561934e089" requirePermission="false" />
      </sectionGroup>

Wrong Format:

<?xml version="1.0"?>
<configuration>
   <appSettings>
       ...
       ...
       ...
   </appSettings>
   <configSections>
      .....
    </configSections>

This is just one of the reasons for which the exception is thrown. There are more than one reasons for it. For me, this solution worked out. Hope it works out to you as well! 🙂

Hope this helps!!

[QUESTION-Help required] Pagination in asp:DataGrid. Aligning page numbers to the center

Hi,

I’m using an asp:DataGrid control with Pagination. But I want the page numbers appearing at the bottom of the page to span all the columns of the DataGrid as opposed to the one that I’m currently getting. Please check below image. This is what I’m getting currently.

What I'm currently getting is this.
What I’m currently getting is this.

But I want the page numbers to span all the columns or at least appear a little spaciously (Not just under first column). Not just the first column as seen above. Any suggestions??


Thanks a lot!

[QUESTION- Please Help] IIS throwing HTTP 404 not found but requested resource actually exists. Requested URL also changing automatically.!

Hi all,

I’m facing a really weird scenario here with my local IIS. I have hosted multiple sites in the default website in my local IIS. One of them has the login page. From the login page, I’m redirecting the user to another page that is located in another site (which is also hosted in the same IIS inside default website virtual directory).

Now in the submit button click event of my login page, after authenticating the user, I have written a “Response.Redirect(redirect_url)“. the redirect_url is being formed dynamically and given as a parameter to the Redirect method.

While debugging, the final redirect_url that is being sent as parameter to Redirect method is:

http://localhost/CP/web/console/console.aspx?sk=3e3cc1a8-73c4-4945-b3f8-08af22ea4324.50008
But after I try to go to the next step, I’m suddenly getting a HTTP 404 error saying that the resource doesn’t exist and I have observed that Requested URL shown in the error page is different that what was dynamically sent to the Response.Redirect(…) method. See error page screen shot below.

localhost being appended automatically

In the error page, the requested url shows the value as

http://localhost/CP/web/console/localhost/CPLogin?err=5

whereas my actual requested url formed in the code is:

http://localhost/CP/web/console/console.aspx?sk=3e3cc1a8-73c4-4945-b3f8-08af22ea4324.50008

I’m just unable to understand why the requested url is getting changed automatically.! Also, I observe that “localhost” is being appended to the requested URL again which is not what is supposed to happen.

Thanks a lot.!

Getting a machine name of logged in user in asp.net

Hi,

I recently encountered this scenario and thought of blogging about it. To get the machine name of the logged in user, you can use the “GetHostEntry()” method provided in System.Net.Dns class.

GetHostEntry takes a string as parameter and it is the hostname or address of the machine whose entry we need to get. So in order to get the machine name, we need to make use of the server variable remote_addr.

GetHostEntry returns an IPHostEntry object and its HostName property would give the machine name of the logged in user. So the line of code would be

System.Net.Dns.GetHostEntry(Request.ServerVariables["REMOTE_ADDR"]).HostName;


Hope this helps!

How to implement a multi-column Dropdown list? See attached image for more clarity

Hi,

This post is more of a question than an article.

I want to implement a multi-column drop down box where in I should be able to filter the results appearing below as I type along with auto-complete feature. A sample implementation of what I want can be seen in the below image.

Multi-column-DropDown-Combo-Box

I want to implement a similar Drop down list using C#. Can someone please help me out with it? I have referred to THIS LINK which pretty much shows exactly what I’m expecting but it is being done in LightSwitch. I’m not really aware of LightSwitch but still I’m trying. Meanwhile, if someone can guide me in creating similar functionality in C#, ASP.NET, it would be great! 🙂

Thanks a lot!!

Converting a string to stream and a stream to string in C#

Hi,

Today I’ll just put a small post about converting a string to stream and a stream to string in C#. These conversions are pretty much simple but they did cause some trouble to me. So thought I would just put it in my blog for easy reference later on.


Converting a string to stream in C#:

There are two steps in this process.

  1. Convert your string to byte array
  2. Read that byte array into a stream


Both the steps can be showing with the following code snippet:


string myString = “Amogh Natu”;

byte[] arrayOfMyString = Encoding.UTF8.GetBytes(myString”);

MemoryStream stream = new MemoryStream(arrayOfMyString);


The above variable named “stream” would have the stream notation of the string.


Converting a stream to string in C#:


This conversion is pretty much straight forward. The “ReadToEnd()” method does all the work for us by converting the stream into a string.


//Stream inputStream

string myString = stream.ReadToEnd();


Now “myString” would hold the string representation of the stream.


Hope this helps.! 🙂


Accessing impersonated user’s details from code behind in C#

Hi all,

Many of us might know that in web development, config files play a very important role. Reading config file entries in a code-behind file is a very common thing in web development.

Config entries are stored in web.config file in the <appSettings> tag and can be accessed using System.Configuration.ConfigurationManager.AppSettings[“keyName”];

But there might be a case when we may have to access the impersonated user’s details in our code. These details cannot be accessed using ConfigurationManager.AppSettings[].


To access the Impersonated user’s details, we use the classes in the namespaces

System.Web.Configuration and System.Configuration.

First, we open the configuration file as a “Configuration” object using the WebConfigurationManager.OpenWebConfiguration(“pathToConfigFile”) method. The WebConfigurationManager class is defined in the System.Web.Configuration namespace.


Then we get the identity section from the config file to retrieve the user details. This is achieved using the IdentitySection class defined in System.Web.Configuration namespace and “GetSection()” method of “Configuration” class.

The “GetSection()” method returns the ConfigurationSection object specified in the parameter to the method. The return object is to be type cast into the required object type, in this case, “IdentitySection”.


Then, IdentitySectionObject.propertyName gives the value of the corresponding property.


The complete sample code is as shown. I have written the code in the Page_Load method for the time being.


using System.Web.Configuration;

using System.Configuration;


protected void Page_Load(object sender, EventArgs e)

{

        Configuration objConfigFile;

        objConfigFile = WebConfigurationManager.OpenWebConfiguration(HttpContext.Current.Request.ApplicationPath);


        IdentitySection objIdentitySection = (IdentitySection)objConfigFile.GetSection(“system.web/identity”);


        if (objIdentitySection != null)

        {

            string username = objIdentitySection.UserName;

            string password = objIdentitySection.Password;

            bool impersonate = objIdentitySection.Impersonate;

            Configuration currentCOnfiguration = objIdentitySection.CurrentConfiguration;

         }

    }


The entry in the web.config file is as given below.


<system.web>

        <identity impersonate=”true” username=”domain\username” password=”pwdrandom” />

</system.web>


Make sure you specify the domain of the computer in the username part because if you specify only the username, there is a chance that you might get a runtime exception saying

Could not create Windows user token from the credentials specified in the
config file. Error from the operating system ‘Logon failure: unknown user
name or bad password.”


Hope this helps!! 🙂

Moving items between ListBoxes using JavaScript

Hi Everyone,

We all would have encountered the situation below where we are asked to select few items from a list of items. The selected items are transfered to another listbox by clicking a simple button. I have put a sample screen shot of that below.

Image

Now lets see how this can be achieved using JavaScript in ASP.NET.

Create a new ASP.NET website in VS2010. Visual Studio will automatically add a default.aspx page which has a master page to it. Lets add the Listbox controls to the page. I’ll put the Listboxes and buttons in a table tag so that the output is better..

The code is as shown:

Image

Coming to the code,

You can see that I have added a label, two ListBoxes and two buttons, one to add items, other to remove the items. The first listbox is populated with static data (You can also load data into it dynamically from Database). The second ListBox is initially empty.

Before I explain the attributes of the “Button” control, I would like to explain the JavaScript function that I have written in order to perform the transfer of items. Again a screen shot of the JavaScript function.

Image

The function takes two parameters:

  1. the source listbox ID
  2. the target listbox ID

I have put comments in the code so that it is understood easily. Basically what is happening in the function is the selected items in the source listbox are taken. New “Option” is created for the target listbox and the items are added into the target listbox. Also, the selected items are removed from the source listbox.

Now coming back to the ASP.NET code, you can see that I have added an “OnClientClick” attribute to the button controls. This is because I have to call a javascript function on the Click event of the button. So for the “OnClientClick” attribute, we specify what type of script we are calling and also the name of the function along with parameters.

You can observe the following line in the OnClientClick attribute for the Add button:

OnClientClick=”javascript:selectItems(‘MainContent_lstboxItems’, ‘MainContent_lstboxSelectedItems’)”

If you get a doubt as to why I have put “MainContent_” before the IDs of the source listbox and the Target listbox, the reason is, our Default.aspx is placed inside a content place holder. Remember I mentioned that default.aspx has a master page to it earlier in this post?

So when a page placed in a content place holder is rendered, the IDs of all the controls in the page are Prefixed with the ID of the ContentPlaceHolder in which the page is placed. (“MainContent” in this example).

You are not done with this. You also have to add the HTML “onclick” attribute to the buttons in order to make it work. Add the below lines in the Page_Load function of Default.aspx.

btnAddItem.Attributes.Add(“onclick”, “return selectItems(‘” + lstboxItems.ClientID + “‘, ‘” + lstboxSelectedItems.ClientID + “‘);”);

btnRemoveItem.Attributes.Add(“onclick”, “return selectItems(‘” + lstboxSelectedItems.ClientID + “‘, ‘” + lstboxItems.ClientID + “‘);”);

Now save, build and run the application. You can move the items among the list boxes.

Hope this helps! 🙂

Webhooks, webhook urls and an implementation of webhooks (sample)

Hi,

Today I would discuss about webhooks, webhook Urls and finally how to implement a webhook url. I had to implement the webhook url concept recently and boy! I had to struggle a lot for understanding what webhook actually means and also the implementation of a webhook. But when I actually got the whole idea, I understood that webhook is nothing but a simple HTTP POST! 😐

During my struggle, I searched a lot for an article that would give the whole idea properly at one place but couldn’t find it. So I decided to write about it myself in my words. Here I would like to bring to your notice that the article below is purely my own understanding. Please do correct me if I’m wrong somewhere because I don’t want to spread wrong information 🙂 Comments and suggestions are more than welcome….. 🙂

So firstly, what is a webhook?

In technical terms, a webhook is basically a user-defined HTTP callback that is triggered when a particular event occurs at the source site. When the event occurs, the source site makes an HTTP request to the URL specified as a webhook.

Some of the places where webhooks can be used are:

1)      Notifications

2)      Data syncing

3)      Modifications

4)      Plugins

I have a feeling that the above paragraphs might have sounded like blah-blah for someone. (They sounded that way for me when I referred to this in wikipedia). … … 😐

So, in simple words, a webhook is nothing but a web service that accepts HTTP POST requests (rather, listens to requests) from a source. So again, a webhook is nothing but a REST service that accepts data or stream of data.

Coming to a sample implementation, let’s consider a website http://www.fullcontact.com. FullContact stores all the social profile details of a particular user registered with it. For accessing all the social profile data of a particular user, we need to query the FullContact database with the email id and an API Key (the key is generated and provided by FullContact once a user registers with the site).

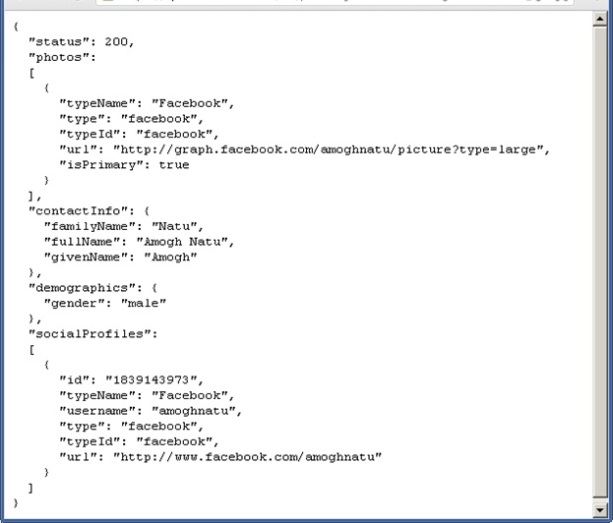
A sample query output from full contact is as shown.

Image

We can take this JSON to process it and do whatever we want to do. But FullContact API also provides the webhook feature wherein it can post the above JSON to a “webhook url” if specified in the query to Full Contact.

So what’s a “webhook url”?

Now say I have written a REST web service that accepts this JSON and processes it. So the webhook url now would be nothing but the address of my service.

I just append the “&webhookUrl=http://myserver/myService.svc” to the address of the query and Full Contact automatically posts the above JSON to the specified URL.

So initially, my query to Full contact looked something like this:

https://api.fullcontact.com/v2/person.json?email=XXXXX@YYYY.ZZZZ&apiKey=XXXXXXXXXXXXXXXX

The above query would show all the social profile information of the person as shown in the above screen shot.

Now, if we want to query Full Contact by specifying a webhook URL, then the query would look something like

https://api.fullcontact.com/v2/person.json?email=XXXX@YYYY.ZZZ&webhookUrl=http://myServer/MyServiceUrl&apiKey=XXXXXXXXXXXXXXXXXXXX

The above query would cause FullContact to POST the json to the service that has been specified as the webhook Url. We can also specify a webhook ID for use in the service’s side. The webhook id is specified just like the webhook url. Full Contact will simply send it as it is to the service. This webhook Id can be used at our service side for identifying as to whom the JSON belongs to. Just add a “&webhookId=XYZ” to the above URL before specifying the API key.

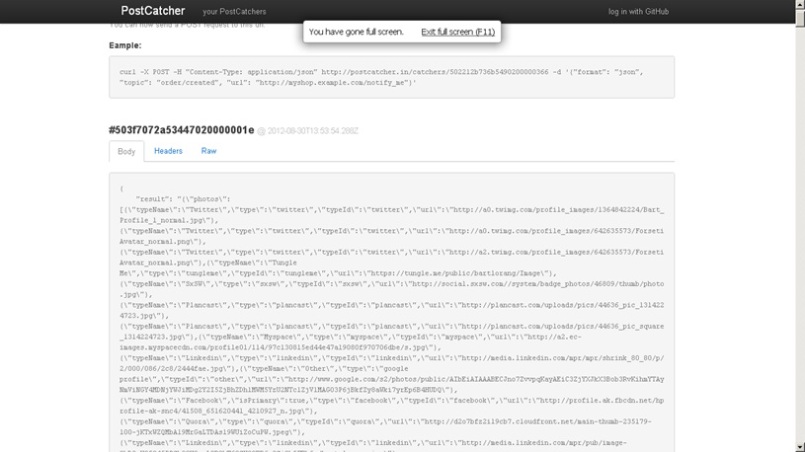
To check how FullContact API posts the json data to our webhook url, we can use “PostCatchers” in place of webhook url, which shows what POST data it has received. A sample query with post catcher is as shown below

https://api.fullcontact.com/v2/person.json?email=XXXX@yyyy.zzz&webhookUrl=http://postcatcher.in/catchers/502212b736b5490200000366&apiKey=XXXXXXXXXXXXXX

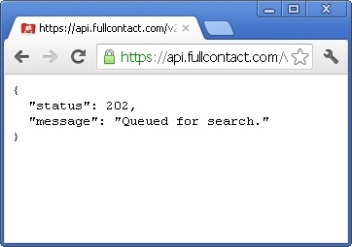
In the browser, we see the response shown below.

Image

And the next screen shot shows the data that has been sent to the dummy webhook url (postcatcher.in). I cannot not show the entire response but basically the response has the complete json pertaining to the contact requested in the url.

Image

At our service’s side, that is, at the webhook’s side, we only need to de-serialize the received json stream into the corresponding class and work with it as we want to.

(Link for tutorial on deserializing JSON. Talks mainly about using Newtonsoft.json.dll)

(Link for Newtonsoft.Json documentation)

The above JSON sent by Full Contact contain two parts, one is “result” and other is “webhookId”. The result tag contains the JSON corresponding to the email id (i.e., corresponding to a contact). The other part, webhookId, contains the id that we pass in the URL. It is sent back as it is.

So enough of theoretical part, I’ll discuss about the code part in the next post. 🙂

Till then, Happy coding!!  🙂

Uploading large files using asp.net and IIS6.0

Hi,

We all must have obviously uploaded files somewhere or the other. Even in the websites that we create using ASP.NET, we might have to put the asp:fileupload control to facilitate file upload feature.

While developing websites or web applications, we might come across requirements that specify: Allow users to upload large files (file size typically greater than 10MB)

In such a case, only putting a file upload control in our website isn’t sufficient. The reason for this is, the upload filesize limit is set to 4MB by default in ASP.NET.

To allow large files to be uploaded in our website, we need to make a few configuration changes. The “httpRuntime” tag in the web.config file is where we need to change the file size limit.

The <httpRuntime> tag has an attribute “maxRequestLength” whose value is specified in “KiloBytes“. Also, increase the value of the “executionTimeout” attribute of the same tag so that the uploading doesn’t time out before the entire file has been uploaded.

The tag would look something like this:

<httpRuntime maxRequestLength=”2097152″ executionTimeout=”9999999″ />

This would allow for files upto 2GB to be uploaded. I have discussed this scenario more clearly in this post

But in some cases, we might also need to make changes at IIS side. We need to increase the values of some attributes in the Metabase file of IIS.

The Metabase.xml file is the one we need to modify to allow large files to be uploaded. This file is located at

C:\Windows\System32\inetsrv\

location.

But this file is by default in Read-Only mode and this cannot be changed by right-clicking the file and changing the mode. It has to be made editable in another way.

Procedure to make Metabse.xml editable: (FOR IIS 6.0 only)

  1. Open IIS manager (open Run -> type ‘inetmgr’ -> press enter)
  2. Right-click on the local computer name. Click on Properties.
  3. Enable the Checkbox that reads “Enable Direct Metabase Edit”.
  4. Click on Apply. Then OK.

The above procedure is only for IIS 6.0 as in IIS 7.0 and above, microsoft has removed the Enable Direct Metabase Edit option. I’ll come back to that later.

So, after the Metabase.xml file has been made editable, navigate to the file location. Its better to take a back up of the file before modifying it (just to be on the safe side :-)). The attributes to be modified are:

  1. AspBufferingLimit
  2. AspMaxRequestEntityAllowed

The values of both the attributes are specified in “BYTES“. Be careful about the units in which the values of these attributes are specified. The ones in IIS take values in BYTES. The one in the web.config file takes values in KILOBYTES.

Modify the values in the above attributes and save the file. Now your website should allow files upto 49MB to be uploaded. It is said that files upto even 100MB can be uploaded but I could never accomplish that! 😦 The maximum filesize my website accepted was 49MB. If anyone can come up with a solution to this, please make sure you share it 🙂

Another thing I would like to add to this is that if you are using web service to upload the file to an external content database like SharePoint, then you will have to change the binding configuration of the services as well.

When we add a service reference to our website, the corresponding service inding information is added to the web.config file in the website. To allow large files to be uploaded, the attributes in the binding information to be modified are:

  1. maxBufferSize
  2. maxReceiveMessageSize
  3. maxBufferPoolSize
  4. maxDepth
  5. maxStringContentLength
  6. maxArrayLength

Also, make sure you increase the timeout values here as well.

Please feel free to comment or make any corrections if required anywhere 🙂

Hope this helps 🙂

Error Condition: HttpException: maxRequestLength exceeded. ASP.NET

Hi,

While building ASP.NET web applications, we all would have almost certainly used the file upload control. But sometimes, we might encounter an exception message which reads, “System.Web.HttpException: maxRequestLength exceeded”.

The cause of this exception is simple. “maxRequestLength” attribute of the “httpRuntime” tag specifies the maximum size of input files that can be uploaded. By default, the value of this attribute in ASP.NET 4.0 is 4096KB (4 MB).

This value is set in the “machine.config” file which sets the maximum allowable file size for the entire machine as 4MB. This can be easily changed by modifying the “machine.config”. The configuration entry is as follows:

<httpRuntime maxRequestLength=”4096″ />

The size is always mentioned in “Kilo Bytes”. If we want the maximum allowable size of files to be say 25MB, then all we need to do is change the value of “maxRequestLength” attribute to 25600.

<httpRuntime maxRequestLength=”25600″ />

The above line would allow files up to 25MB to be uploaded. If this entry is added in the machine.config file, then all websites in that machine would allow files up to 25MB to be uploaded. If that entry is added in a particular website’s “web.config” file, then only that website would allow files up to 25MB to be uploaded. Other websites would allow only up to 4MB (Default size) files to be uploaded.

Just as an addition, the “machine.config” file is located at “%SystemRoot%\Microsoft.NET\Framework\Version\Config\machine.config”.

“SystemRoot” is the location where Windows is installed. Generally it is “C:\Windows”.

Hope this helps … 🙂