How to implement a multi-column Dropdown list? See attached image for more clarity

Hi,

This post is more of a question than an article.

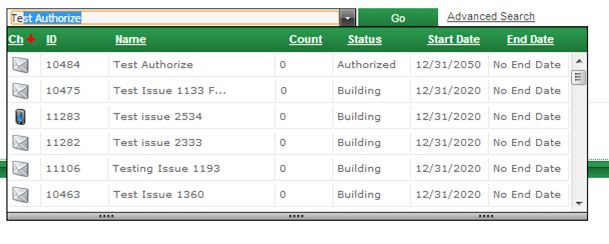
I want to implement a multi-column drop down box where in I should be able to filter the results appearing below as I type along with auto-complete feature. A sample implementation of what I want can be seen in the below image.

Multi-column-DropDown-Combo-Box

I want to implement a similar Drop down list using C#. Can someone please help me out with it? I have referred to THIS LINK which pretty much shows exactly what I’m expecting but it is being done in LightSwitch. I’m not really aware of LightSwitch but still I’m trying. Meanwhile, if someone can guide me in creating similar functionality in C#, ASP.NET, it would be great! 🙂

Thanks a lot!!

Moving items between ListBoxes using JavaScript

Hi Everyone,

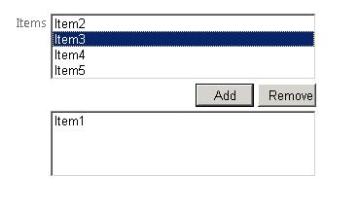
We all would have encountered the situation below where we are asked to select few items from a list of items. The selected items are transfered to another listbox by clicking a simple button. I have put a sample screen shot of that below.

Image

Now lets see how this can be achieved using JavaScript in ASP.NET.

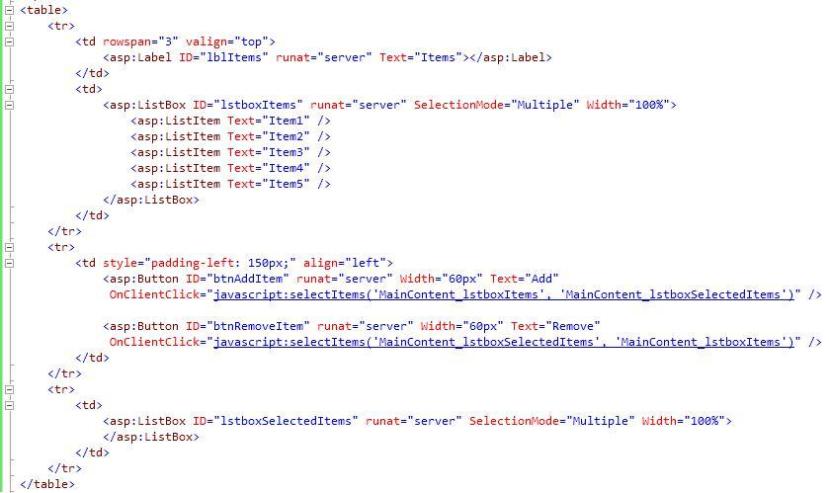
Create a new ASP.NET website in VS2010. Visual Studio will automatically add a default.aspx page which has a master page to it. Lets add the Listbox controls to the page. I’ll put the Listboxes and buttons in a table tag so that the output is better..

The code is as shown:

Image

Coming to the code,

You can see that I have added a label, two ListBoxes and two buttons, one to add items, other to remove the items. The first listbox is populated with static data (You can also load data into it dynamically from Database). The second ListBox is initially empty.

Before I explain the attributes of the “Button” control, I would like to explain the JavaScript function that I have written in order to perform the transfer of items. Again a screen shot of the JavaScript function.

Image

The function takes two parameters:

  1. the source listbox ID
  2. the target listbox ID

I have put comments in the code so that it is understood easily. Basically what is happening in the function is the selected items in the source listbox are taken. New “Option” is created for the target listbox and the items are added into the target listbox. Also, the selected items are removed from the source listbox.

Now coming back to the ASP.NET code, you can see that I have added an “OnClientClick” attribute to the button controls. This is because I have to call a javascript function on the Click event of the button. So for the “OnClientClick” attribute, we specify what type of script we are calling and also the name of the function along with parameters.

You can observe the following line in the OnClientClick attribute for the Add button:

OnClientClick=”javascript:selectItems(‘MainContent_lstboxItems’, ‘MainContent_lstboxSelectedItems’)”

If you get a doubt as to why I have put “MainContent_” before the IDs of the source listbox and the Target listbox, the reason is, our Default.aspx is placed inside a content place holder. Remember I mentioned that default.aspx has a master page to it earlier in this post?

So when a page placed in a content place holder is rendered, the IDs of all the controls in the page are Prefixed with the ID of the ContentPlaceHolder in which the page is placed. (“MainContent” in this example).

You are not done with this. You also have to add the HTML “onclick” attribute to the buttons in order to make it work. Add the below lines in the Page_Load function of Default.aspx.

btnAddItem.Attributes.Add(“onclick”, “return selectItems(‘” + lstboxItems.ClientID + “‘, ‘” + lstboxSelectedItems.ClientID + “‘);”);

btnRemoveItem.Attributes.Add(“onclick”, “return selectItems(‘” + lstboxSelectedItems.ClientID + “‘, ‘” + lstboxItems.ClientID + “‘);”);

Now save, build and run the application. You can move the items among the list boxes.

Hope this helps! 🙂

Uploading large files using asp.net and IIS6.0

Hi,

We all must have obviously uploaded files somewhere or the other. Even in the websites that we create using ASP.NET, we might have to put the asp:fileupload control to facilitate file upload feature.

While developing websites or web applications, we might come across requirements that specify: Allow users to upload large files (file size typically greater than 10MB)

In such a case, only putting a file upload control in our website isn’t sufficient. The reason for this is, the upload filesize limit is set to 4MB by default in ASP.NET.

To allow large files to be uploaded in our website, we need to make a few configuration changes. The “httpRuntime” tag in the web.config file is where we need to change the file size limit.

The <httpRuntime> tag has an attribute “maxRequestLength” whose value is specified in “KiloBytes“. Also, increase the value of the “executionTimeout” attribute of the same tag so that the uploading doesn’t time out before the entire file has been uploaded.

The tag would look something like this:

<httpRuntime maxRequestLength=”2097152″ executionTimeout=”9999999″ />

This would allow for files upto 2GB to be uploaded. I have discussed this scenario more clearly in this post

But in some cases, we might also need to make changes at IIS side. We need to increase the values of some attributes in the Metabase file of IIS.

The Metabase.xml file is the one we need to modify to allow large files to be uploaded. This file is located at

C:\Windows\System32\inetsrv\

location.

But this file is by default in Read-Only mode and this cannot be changed by right-clicking the file and changing the mode. It has to be made editable in another way.

Procedure to make Metabse.xml editable: (FOR IIS 6.0 only)

  1. Open IIS manager (open Run -> type ‘inetmgr’ -> press enter)
  2. Right-click on the local computer name. Click on Properties.
  3. Enable the Checkbox that reads “Enable Direct Metabase Edit”.
  4. Click on Apply. Then OK.

The above procedure is only for IIS 6.0 as in IIS 7.0 and above, microsoft has removed the Enable Direct Metabase Edit option. I’ll come back to that later.

So, after the Metabase.xml file has been made editable, navigate to the file location. Its better to take a back up of the file before modifying it (just to be on the safe side :-)). The attributes to be modified are:

  1. AspBufferingLimit
  2. AspMaxRequestEntityAllowed

The values of both the attributes are specified in “BYTES“. Be careful about the units in which the values of these attributes are specified. The ones in IIS take values in BYTES. The one in the web.config file takes values in KILOBYTES.

Modify the values in the above attributes and save the file. Now your website should allow files upto 49MB to be uploaded. It is said that files upto even 100MB can be uploaded but I could never accomplish that! 😦 The maximum filesize my website accepted was 49MB. If anyone can come up with a solution to this, please make sure you share it 🙂

Another thing I would like to add to this is that if you are using web service to upload the file to an external content database like SharePoint, then you will have to change the binding configuration of the services as well.

When we add a service reference to our website, the corresponding service inding information is added to the web.config file in the website. To allow large files to be uploaded, the attributes in the binding information to be modified are:

  1. maxBufferSize
  2. maxReceiveMessageSize
  3. maxBufferPoolSize
  4. maxDepth
  5. maxStringContentLength
  6. maxArrayLength

Also, make sure you increase the timeout values here as well.

Please feel free to comment or make any corrections if required anywhere 🙂

Hope this helps 🙂
Error Condition: HttpException: maxRequestLength exceeded. ASP.NET

Hi,

While building ASP.NET web applications, we all would have almost certainly used the file upload control. But sometimes, we might encounter an exception message which reads, “System.Web.HttpException: maxRequestLength exceeded”.

The cause of this exception is simple. “maxRequestLength” attribute of the “httpRuntime” tag specifies the maximum size of input files that can be uploaded. By default, the value of this attribute in ASP.NET 4.0 is 4096KB (4 MB).

This value is set in the “machine.config” file which sets the maximum allowable file size for the entire machine as 4MB. This can be easily changed by modifying the “machine.config”. The configuration entry is as follows:

<httpRuntime maxRequestLength=”4096″ />

The size is always mentioned in “Kilo Bytes”. If we want the maximum allowable size of files to be say 25MB, then all we need to do is change the value of “maxRequestLength” attribute to 25600.

<httpRuntime maxRequestLength=”25600″ />

The above line would allow files up to 25MB to be uploaded. If this entry is added in the machine.config file, then all websites in that machine would allow files up to 25MB to be uploaded. If that entry is added in a particular website’s “web.config” file, then only that website would allow files up to 25MB to be uploaded. Other websites would allow only up to 4MB (Default size) files to be uploaded.

Just as an addition, the “machine.config” file is located at “%SystemRoot%\Microsoft.NET\Framework\Version\Config\machine.config”.

“SystemRoot” is the location where Windows is installed. Generally it is “C:\Windows”.

Hope this helps … 🙂